Recipe Links
Basil Oglio Fra Diavlo Black Pepper and Fennel Shortbread Crackers Bleu Bacon and Italian Burgers Blueberry Almond Crumble Pie Braised Beef Short Ribs Breakfast Sausage Butter Pecan Shortbread Cookies Buttermilk Pancakes California Grilled Artichokes Capressa Fra Diavlo Cherry Garcia Icecream Cherry Sangria Chicken and Polenta Chicken Cacciatore Chicken Vegetable Soup with Broccoli Rabe Chocolate Cake with Chocolate Ganache Frosting Chocolate Sparkle Cookies Christmas Shortbreads Classic Hummus Coconut Cake Coq Au Vin Wine Braised Chicken Cranberry Orange Crumb Cake Cream Corn and Lima Bean Succotash Devishly Chewy Brownies Eggplant Parmesan Fetticini Alfredo with Bacon and Peas Fusilli a la Vodka Sauce Ginger Chocolate Spice Cookies Gnocci with Broccoli Rabe and Sausange Gramma Daly's Cole Slaw Grilled Beef Tenderloin with Blue Cheese Butter Grilled Swordfish Hazelnut Biscotti Cookies Heavenly Blondies Homemade Italian Sausage Homemade Sauerkraut Hot Artichoke Dip Italian Meatballs Little Sister's BBQ Ribs Molten Chocolate Cake Olio fra diavlo pasta salad Pumpkin Gingerbread Cake Quiche (Sans the Lorraine) Red Velvet Cake Seafood Francaise Shaved Brussel Spouts & Polenta Cake Slow Cooker Thai Pork and Coconut Rice South Florida Fish Stew Spagetti ala Olio Aglio and Pepperoncino Spiced Pear and Cranberry Chutney Steak Braciole Sunday Tomato Sauce Sweet Potato Corned Beef Hash Swordfish Oreganade Teriyaki Pork Tenderloin and Spicy Thai Peanut Sauce The White House Maryland Crab Cakes Tomato Bisque with Chichen and Rice Turkey Paprikash Soup Walnut Shortbread Christmas Cookies White Bean Pasta Fagioli

Better ingredients, better technique, better results.

Entries by Margot (70)

Sunday
Sep222013

Grace's Favorite (Tomato Bisque with Chicken and Rice) Soup

I didn’t have a name for this soup, and it is Grace’s favorite, so it seemed obvious.  I was battling a cold and wanted soup, so Chris called The Ivory Restaurant in Deep River to see what soup was on the menu.  Ernan, the chef, said he would make something for me, and he came up with this soup.  I took a stab at my own version.

Ingredients:

4 strips bacon, cut in ½ pieces
2 Tbs butter
2 medium sweet onions, diced
2-4 cloves garlic, minced
3 stalks celery, diced
2 large carrots, diced
1 Tbs dried savory (oregano will work if you don't have savory)
6 ripe tomatoes, seeded and diced (or 1/2 28 ounce can crushed tomatos)
4 cups chicken stock (preferably homemade)
½ cup heavy cream
2 cups cooked chicken, diced or shredded
2 cups cooked basmati rice (optional)
Salt & Pepper to taste 

  • At the bottom of a large Dutch oven, render the bacon until it is crisp, then remove from the pan to paper towels and reserve
  • Add the butter, and when it is melted and bubbly, add the garlic and allow to cook in the butter until it becomes fragrant, but don’t let it start to brown.
  • Add in the onions and the celery and stir to get the garlic off the bottom of the pan. 
  • When the onions and celery start to become translucent, add the carrots and sauté another five minutes.   
  • Season with savory, salt & pepper at this stage, and allow to sauté for another minute.
  • Add the tomatoes and about 2 cups of the stock, bring the mixture up to a boil and allow the carrots to cook through until they are soft.   Using an immersion blender (I wouldn’t be without one.  They are far less messy than trying to do this with a food processor or a blender, but you can if you want to.), puree the mixture until it becomes almost a sauce.  We’re not looking for baby food,  we still want some texture.  Add the remaining stock and heat it through.
  • At this stage, I will usually take half the soup base out of the pan, and freeze it.  This makes quite a bit of soup, and I will use it again the next time I have left-over chicken.  Thaw it, then continue:
  • Add the cream and bring it to a slow simmer for about minutes.  
  • Add the chicken (and the optional rice) and let it heat through.
  • Ladle into bowls, and sprinkle with a few bits of the cooked bacon and some parmesan cheese if you like.
Sunday
Aug252013

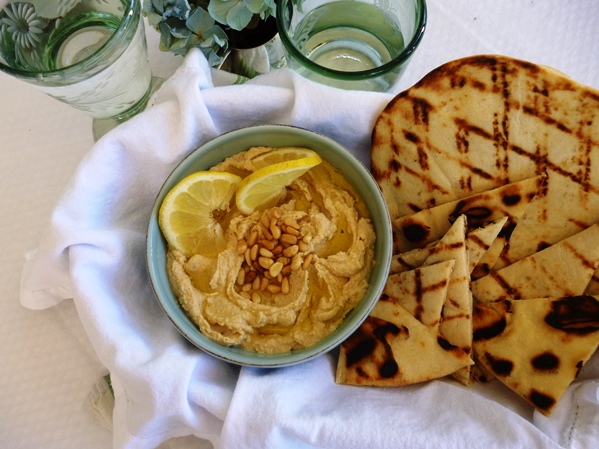
Classic Hummus

There are two secrets to this recipe: the first is getting the tahini paste mixed properly. To do this, empty the entire contents of the tahini paste can into a large bowl. Mix with a fork until completely blended. Measure out one cup for this recipe and scrape the remaining tahini back into the can. What’s left in the can should be enough for another recipe, with enough room to mix the tahini in the can next time.  Trust me, this is far less messy than trying to mix up the paste in a full can.

The other secret is to buy good quality flatbread and grill it outside if you can.  If you can’t, grill it inside on a grill plate.  If you are going to serve it with chips out of a bag, you might as well just buy the hummus, and forget this blog.

Ingredients:

2 15-ounce cans chickpeas
8-10 cloves garlic, peeled and roughly chopped
1 cup sesame tahini paste
1 teaspoon lemon zest
Juice of two lemons
½ cup water
2 Tbs Extra Virgin Olive oil
Salt and pepper 

  • Drain and rinse chickpeas, and place in a food processer with knife attachment.
  • Add the roughly chopped garlic and process until completely smooth.
  • Add lemon juice, water, and tahini, then process again until smooth
  • Add olive oil and lemon zest and process until incorporated.
  • Add salt and pepper to taste.
  • To serve, drizzle with olive oil, sprinkle with sea salt, and garnish with lemon, pine nuts, or roasted red peppers. Serve with grilled flatbread.
Tuesday
Aug202013

Swordfish Oreganade

The dish I originally was made with a white fish fillet (scrod, cod, flounder or sole), however all are so flaky they are nearly impossible to grill, which is why I tried this dish with Swordfish.  Both are fabulous.  If you want to use thin white fish fillets, salt the fish, and sauté in olive oil, then remove it from the pan and keep in warm in the oven while you make the sauce.  I tend to use Angel Hair pasta for a lot of my sauces that are more chunky than creamy.  I think it holds the sauce better and doesn’t spatter as much.  I can make just as big a mess of my shirt as my kitchen.

Ingredients

1 whole Swordfish Steak (both loins), cut about 1 ½ inches thick
2 Tbs Olive oil for grilling
2 Tbs Extra Virgin Olive Oil for the sauce
4 large beefsteak tomatoes or about 8-10 plum tomatoes
4 cloves garlic, minced
1 Tbs fresh chopped oregano leaves
1 tsp red pepper flakes
½ pound cooked pasta 

  • Trim the swordfish of the skin and the bloodline, leaving two large loins of fish.  Put the fish in a flat glass or metal pan, pour the olive oil over the fish and salt it.  Leave fish in the refrigerator until you are ready to cook it.
  • Core, seed and dice the tomatoes.
  • In a large sauté pan, add the Extra Virgin Olive Oil to the pan, and when it starts to shimmer, add the minced garlic, the red pepper flakes and the chopped oregano.  Saute until the garlic starts to turn golden.
  • Add the chopped tomatoes and let them sauté until they begin to release their liquid.  You can turn off the pan until you are ready to cook the fish.
  • Heat your grill to high, including the grill plate.  I always use one with fish as it creates more surface for searing and prevents the fish from flaking off through the grates.
  • Brush the fish with the oil sitting in the pan, and place on the grill plate, oil side down.  Don’t move them.  Shut the grill cover, set your timer for 5 minutes and walk away.
  • After five minutes, brush the other side of the fish with the oil in the pan and carefully slide a metal spatula under the fish.  If the fish sticks to the grill, it’s not ready to turn.  It will release itself when it’s ready.
  • Turn the fish, don’t move it, shut the cover, and set the timer for another 5 minutes and walk away.  Go inside and check on your pasta, and turn the heat back on under the tomato sauce.
  • Drain the pasta, and spoon some of the sauce into the pasta, then serve the fish and the remaining sauce over the pasta.   Or, skip the pasta altogether and just spoon the sauce over the fish.
  • I know lots of people who insist you don’t serve cheese with fish, but some fresh grated parmesan cheese wouldn’t be the worst thing in the world on this dish.
Tuesday
Jul302013

Eggplant Parmesan

This dish is a labor of love.  Depending on how much I make, I usually do it over at least three days.  It has three components:  Fried Eggplant, Tomato Sauce, and a Cheese Layer.  I would strongly advise you to make the eggplant and the sauce separately.  Then freeze them until you are ready to assemble and bake the dish.  

Fried Eggplant

The eggplant makes a huge mess in the kitchen, hence the labor of love categorization.  Choose the slightly longer, narrower eggplant (not the little japanese ones), because they have less seeds, and they are easier to slice uniformly.  This makes enough for two large pans approximately 9" x 13" x 3" and it took me three hours, including clean up.

6 large eggplant
1-2 dozen eggs (have 2 on hand, just in case)
2 cups all purpose flour
1 quart vegetable oil (I like corn oil for this recipe)
2-4 Tbs Salt
1-2 tsp finely ground black or white pepper
1 roll very absorbent paper towels
Waxed paper and 3 gallon size zip lock freezer bags 

  • In a shallow bowl or pie plate, crack about 4 eggs, then add about 1/4 cup of water, 1/2 tsp of the salt, and a pinch of the pepper, and whisk thoroughly.
  • In a medium bowl, add the flour, about 2 tsp of the salt, and a tsp of the pepper, and mix thoroughly.
  • In a large sheet pan or tray, layer paper towels, and have more layers ready to stack the eggplant as they come out of the frying pan.
  • Cut the stem end, peel the eggplant, and slice each eggplant into 1/8" slices, and place in a large bowl.
  • Add enough corn oil to the largest frying pan you have to cover the bottom of the pan with about 1/4" of oil.  Heat the pan to medium high heat.
  • Test the oil by sprinkling in a little flour to see if it sizzles.  When it does, start the egg wash assembly line.
  • Place a few of the eggplant slices in the flour mixture and toss to coat, then tap each piece against the bowl to get rid of the excess flour and place in the egg wash.
  • Turn the slices to coat with egg wash, lift each piece and allow the excess egg to drip off, then place in the frying pan to brown on both sides.
  • The pieces should be more than golden brown, but not dark brown.  When they are, allow each piece to drip off some of the excess oil and then drain on paper towels. 
  • Taste the eggplant as it comes out of the pan (we used to sprinkle on grated cheese and snack on it the entire afternoon!).  If it needs salt, sprinkly a little on while the slices are still hot.  Just remember, you will be also adding tomato sauce and cheese, which also have salt.
  • Continue this process, adding more flour, salt and pepper, or cracking eggs and whisking in water, salt and pepper, adding more oil to the pan, and occasionally wiping out the burned bits if your pan starts to smoke.
  • If you want to get more than one pan going, you can try it, but I usually don't do this unless I have another person willing to do this with me.  To be honest, if you are going to make this much of a mess, get another person to help you and double up.  It's a lot more fun, takes the same amount of time and makes the same amount of mess.
  • Once you have finished frying the eggplant and they are somewhat cool, stack them on pieces of waxed paper, overlaping eggplant slices, about one eggplant slice wide, about 8-10" long, and about 2-3 inches high.  (Remember, you are going to want to get at least two of these packets into the zip lock bags.)
  • Wrap the packets and place them into a zip lock bag, or wrap in foil, and freeze them.  They will keep a good six months if you can wait that long. 

Marinara Tomato Sauce

This sauce, at least the way I was taught to make it, takes a good 6 hours to simmer if you want that "slow simmered" taste.  There is simply no shortcut.   You can use a meat sauce, but I prefer this dish purely vegetarian.  This recipe makes between 5 and 6 quarts.  If you don't want to make your own Marinara sauce, I recommend Victoria Marinara Sauce, which you can buy in most grocery stores that have an Italian population to serve.  It's great right out of the jar, but a quick doctoring up would make it that much better.  Just saute a little garlic, onion, red pepper flakes and a bit of tomato paste in extra virgin olive oil, throw in the sauce, add a bit of water, and simmer for about 30 minutes.  

4 large sweet onions, diced
6-8 cloves garlic, minced
4 Tbs Extra Virgin Olive Oil
4 28 oz cans crushed tomatos (I like Cento.  Their regular crushed are better than most San Marzano)
2 cans tomato paste
1/4 cup balsamic vinegar
1 tsp red pepper flakes (optional, this is not enough to make it hot, just some additional depth)
About a half loaf of chiabatta bread for the tasting process, is purely optional  

  • In a large dutch oven, heat the olive oil, then add the garlic and the red pepper flakes and saute for one minute.
  • Immediately add the onions, and stir until the garlic is spread throughout the onions as this will prevent burning.
  • Saute the onions until they just start to turn golden.  Not fully carmelized as it will make the suce too sweet and you will loose a bit of their bulk.
  • While the onions are cooking, add the tomato paste to a large bowl, and then whisk in another two cans of water.
  • Add the tomatoes, the tomato paste and the vinegar to the pan and mix thoroughly.
  • The addition of water at this point is strictly experience and instinct.  I usually add about 1 28 oz can of water to the pan.  You are trying to strike a balance between cooking for 4-6 hours, and having the sauce be just the right consistency.  
  • Slow simmering means a very gentle bubble. Any more, and you will burn the sauce on the bottom of the pan.  If that happens, don't panic, just lower the heat and stir it without scraping up the bottom.  You don't want to stir that burned crust into your sauce.  If you have another pan, transfer the sauce to a clean pan and continue to simmer.
  • The only way to tell when this is done is to taste it at two hour intervals of slow simmering. (That's what the bread is for.)  You will see a distinct difference between the 2, 4 and 6 hour tasting.  If you have never had really good slow simmered sauce, go for the 6 hours at least once in your life.
  • Allow the sauce to cool, and then freeze.   For a 9x13x3 inch pan, you need about a quart and a half of sauce.

The Cheese Layer

My family made their eggplant, their lasagna, their manicotti, and their stuffed shells with all the same filling.  Frankly it was not my favorite.  It was fresh ricotta cheese, raw eggs, shredded mozzerella cheese, grated parmesan cheese salt, pepper, and dried parsley.  They just threw the ingredients into a bowl and mixed them up, then layered spoonfuls with more mozzerella.  Sound good?  Then go for it.  I don't like cooked ricotta, and I choked on stringy mozzerella in a restaurant.  I use a soft, unaged Asiago I found at Bishops, and grated Reggiana Parmesan.  Italian Fontina would be a good substitute for the Asiago, or even a combination of the three.  Just grate them by hand.  The key to this dish is ratio.  I am judicious with the amount of both sauce and cheese I use.  About 8 oz of each cheese is more than enough.

Make the Dish

I typically thaw my ingredients in the refridgerator for a day, and then compose the dish.  It will even keep composed in the refridgerator for another day before baking.  Just make sure the dish is somewhat room temperature when it goes into the oven or you will be there waiting for hours to eat.  This takes only about 30 minutes to put together, including grating the cheese.

  • Spread a thin layer of tomato sauce on the bottom of the pan.
  • Layer the eggplant slices, overlapping or cutting them to get a single layer, rather than individual stacks of slices.  Press them down to really pack them in.
  • Spread another thin layer of tomato sauce over the eggplant slices, then sprinkle your mixture of cheese.
  • Continue layering until the pan is full.  I am somewhat light handed on the sauce and cheese.  You can always serve it with additional sauce and cheese for sprinkling, but I'm not fond of a soupy, saucy mess.
  • If your dish is room temperature when you put it in the oven, it should bake at 350 degrees, loosely covered with foil, for about 45 minutes.
  • When the sauce and the cheese are very bubbly, take the foil off, and bake for another 15 minutes, until the top starts to brown.
  • Let the eggplant cool for about 15 minutes before you attempt to slice and serve.

Monday
Jul152013

Hot Artichoke Dip

You can make this with 2 cans of artichoke hearts in water, but it will be the same old, same old 70's concoction.  This recipe makes a lot, so either cut it in half, or make sure you have enough breat, because once the bread is gone, the dip will sit there sadly drying out.  Besides using real artichoke hearts, I also use a good quality flat bread, throw it on the grill or in the oven until it starts to char slightly, then cut it into strips.

Ingredients

About 12 cooked artichoke hearts
½  cup mayonnaise
½ cup sour cream
½ cup freshly grated parmesan cheese, plus extra for topping
Juice of ½ lemon
2 cloves garlic, minced
Couple dashes hot sauce, optional
Couple dashes Worcester sauce
3 packages Naan (2 flats per package) or any quality flat bread
  • Preheat oven to 350 degrees.
  • Put all of the ingredients, except for the bread, into a food processor and process until it’s’ the consistency you want.  
  • If you like it a little chunkier, leave the artichoke hearts until last, mix all of the other ingredients until blended and then add the artichoke hearts.  Process until you have the desired chunky consistency.
  • Spread the dip into a shallow, 1 quart baking dish, and sprinkle a little more cheese on the top.
  • In the picture, my dish is about 9 inches long, 5 inches wide, and 1-1/2 inches deep.  Which, incidentally, was really too small for this recipe.  If I were to make this recipe again, I would use one of my 9 inch square glass baking dishes, which are deeper, or a deep round casserole or soufflé dish.  Just leave yourself a good inch of dish from the dip to the rim, or you will have to perform the next step.
  • If you have put your dip into a dish that is too small, you will need to open up your windows and put on your exhaust fan about 30 minutes into the baking process, because the dip puffs up and spills over, burning cheese all over your oven.
  • Bake for 30-45 minutes, depending on the depth of your dish, and your tolerance to smoke.  Really, until it starts to crust and turn golden on the top.
  • Serve warm or room temperature, with grilled flat bread.
Wednesday
Jul102013

Cream Corn and Lima Bean Succotash

I particularly like the Green Giant Simply Steamed lima beans, which are typically only available at an IGA grocery.  They are very small, very tender and green, and don’t usually suffer from the freezer burn you can find in the bagged frozen vegetables.  This recipe makes about 6 servings

Ingredients

2 boxes frozen baby lima beans
3 ears in-season corn on the cob, just picked if you can find it
2 strips bacon, diced
1/4 cup heavy cream
2 tbs unsalted butter
  • In a medium saucepan, fry the bacon until it is crisp.  Remove from the pan with a slotted spoon to paper towels and reserve.
  • If you want to remove the bacon fat from the pan, you can discard it, but I don’t.  Don’t wash out the pan.  Fill the pan with water and bring it to a boil.
  • Drop the lima beans (remove them from the steamer bag if they came in one), into the water, and boil gently for 6-8 minutes, until they are tender.  Drain and set aside.
  • In the meantime, cut the kernels from the cobs into a bowl, using a small, sharp utility knife, and as deep a bowl as you have.   Trust me on this, it will save you a big mess.  Using the largest holes on a box grater, run the cobs over the holes until there is no more “milk” from the cobs remaining.  Reserve all of this corn and milk.
  • In the same saucepan, melt the butter.  Then add the cream and the grated corn and milk and allow to thicken and reduce slightly.
  • Add the beans and heat through, stirring to incorporate them into the creamed corn.  (It’s not really necessary to cook or boil corn that is this fresh.)
  • Serve with the reserved crumbled bacon on top.
Friday
Jun212013

Cream of Crab and Corn Soup

Otherwise known as she-crab soup, I found this recipe in a book titled “Crazy for Crab” by Fred Thompson.  I did some adaptations, replacing celery for the onion, a splash of hot sauce, and fresh corn off the cob.  This soup, as near as I have been able to replicate it, was always on the menu at The American Café in Washington, DC.  It was probably the first crab anything someone made me try, and I have been on a path to try to replicate it since the 80’s.  It’s as close as my memory will allow.  I actually like to make this soup a couple of hours in advance, allow it to cool, and then heat it up again, so the crab flavor has a chance to develop in the soup.

Ingredients

1 stick unsalted butter
½ cup all-purpose flour
3 stalks celery, finely diced
5 cups half-and-half
2 cups heavy cream
½ teaspoon ground mace
½ cup good quality dry (fino), or medium (amontillado) sherry
3 ears fresh corn on the cob
Salt and pepper
Dash hot sauce
1 lb fresh picked lump or backfin crabmeat (not the kind in the can, the kind in the plastic container at your fish market)
2 hard-boiled large egg yolks, smashed with a fork

  • In a large sauce pan (4 quarts), melt the butter.  When it starts to foam, add the celery and sauté until the celery is sweated (starting to turn translucent).
  • Add the flour and whisk together for 2 minutes to ensure the flour cooks
  • Add the half-and-half and the cream, and slowly bring to a boil.  Reduce the heat to low and simmer for about 5 minutes, stirring constantly, until thickened.
  • Add the sherry; simmer another 2 minutes until the alcohol is cooked off, then season with the salt, pepper, mace and the hot sauce to taste.
  • In the meantime, shuck the ears of corn, and place the cobs, one at a time, in a tall bowl.  With a sharp paring knife, cut the kernels off the cobs.  (If you use a wider bowl, you will have to clean up the mess when the kernels jump off the cob and spatter everywhere.)
  • Using a box grater, scrape each of the cobs against the largest holes, turning the cobs all round, until the liquid is released from the cobs.  Scrape all of this and any other solids into the bowl with the kernels.
  • When the soup is thickened, add the crab meat and the corn, and heat through.   Ladle out the soup, and finish with a ½ teaspoon full of the hard-boiled egg yolk.
Thursday
Jun202013

Cherry Garcia Icecream

We attempted this base vanilla recipe several times, and found this the best method.  We tried to use the mixture when it had chilled only a few hours, but could not get it to the right consistency.  Overnight for both the mixture and the freezer bowl is best.  Makes 2 quarts.
Vanilla Ice Cream Base Ingredients
2 1/3 cups whole milk
2 1/3 cups heavy cream
2 tps pure vanilla extract
3 extra large eggs
4 extra large egg yolks
1 1/8 cup sugar
The day before serving:
  • Cover the freezer bowl of an electric ice cream maker with a plastic grocery-store produce bag, and place it in the freezer overnight.
  • Combine the milk and cream in a medium saucepan.  Heat over medium high until the mixture comes to a scald (just to the point of boiling over, then remove immediately from the heat.)
  • Combine the eggs, egg yolks and sugar in a large bowl.  Using a hand-mixer on medium, beat until the mixture becomes pale yellow and ribbons start to form.
  • Using a measuring cup, whisk in about a cup of the scalded mixture into the eggs to temper them, then slowly add the remaining milk and cream, about a cup at a time, so that the egg mixture doesn’t scramble. 
  • Add the vanilla to the mixture.
  • Cover and refrigerate overnight.
  • 2-4 hours before serving:
  • Remove the plastic bag from the freezer bowl, place it in the ice cream maker, and add the chilled ice cream mixture to the bowl. 
  • Place the mixing arm over the bowl, and turn the machine on.   Allow the mixture to churn for about 30 minutes.   Any additions to the ice cream, such as nuts, should be added during the last couple of minutes.
  • The mixture will have a very soft texture.  For a firmer texture, remove the ice cream to a plastic quart container, cover it, and return to the freezer for at least two hours.  Do not freeze the mixture in the freezer bowl.
  • For serving, allow the ice cream to soften for about 15 minutes to allow scooping.
For the Cherry Garcia Icecream:
1 ½ cups pitted, quartered fresh bing cherries
1 ½ cups good quality chopped dark chocolate
Monday
Jun102013

Buttermilk Pancakes and Homemade Breakfast Sausage

This recipe makes about 20 6 inch cakes.  They are thick, fluffy, and cake-like.  I was able to find real buttermilk at the grocery store, and I think it makes all the difference versus cultured buttermilk.  We just freeze the leftover pancakes so we only make one mess in the kitchen.

Ingredients

4 cups all purpose flour
2 tsp baking powder
1 tsp baking soda
1 tsp salt
¼ cup sugar
4 jumbo eggs
3 cups real butter milk (Kate’s)
1 stick butter, melted

  • Mix the dry ingredients, including the sugar, into a large bowl.  
  • In a smaller bowl, wisk the eggs then add the buttermilk and wisk again.  Pour ½ the melted butter into the eggs and buttermilk and quickly wisk again. 
  • Pour the wet ingredients into the dry ingredients and mix with a whisk or wooden spoon until just combined.  The batter should not be mixed until it is smooth as it will create a tough pancake.  I have also heard that letting your batter rest for about 30 minutes makes a difference in the texture, but I have yet to try it out.  Makes sense though.  Just like letting dough rest.
  • Heat a non-stick griddle to medium high.  I typically try one pancake first, to test the heat.  Then the girl does a taste test to make sure they're not poison.
  • Brush the griddle with some of the remaining melted butter.  If it sizzles immediately, the griddle is ready.  Pour out pancakes to the size you like.  Flip the pancakes when the most of bubbles that form have burst.  
  • If your pancakes are getting too dark on the bottom before the bubbles burst, you will need to turn the heat down, but it's too late for the ones on the griddle.  Turn the heat down, flip them carefully, assume you will mess those up, and let them cook a bit longer on the other side.  
  • If I can, I usually set these aside to go into the freezer, as the heating up process in the toaster over will finish cooking them without drying them out.
  • Flip the pancakes and brush the second side with more of the melted butter.  The pancakes should cook about another 2 minutes.  I transfer them to a plate warming in the oven at 175, until all the pancakes are made and we can all sit down at the same time.
  • Serve with real, warm, Grade A Dark Amber Maple Syrup and Homemade Breakfast Sausage.
Sunday
Jun092013

Breakfast Sausage

After I had successfully made Italian Sausage, I did want to try a batch of breakfast sausage, and I ‘d never made them before.  Not fond of any of the commercial brands.

Did a search on FoodBlogSearch (www.foodblogsearch.com), and the first homemade, non-paid SEO that came up was Homesick Texan.  Having just tried the Banana, Bacon and Pecan pancakes, I immediately went for the breakfast sausage.

Ingredients:

2 lbs ground pork
2 Tbs fresh finely chopped sage leaves
2 tsp kosher salt
1 tsp fresh ground black pepper
1 tsp red pepper flakes
3 Tbs brown sugar

Same process as the Italian Sausage (or buy ground pork), grind the spices, and use the paddle attachment of the stand mixer to mix them into the meat.  Form 3 inch patties and freeze on a tray until solid, then store in a plastic bag until ready to use.  Gently fry these in a little bit of butter for breakfast with Buttermilk Pancakes and scrambled eggs.

Put them together, and all I need is a mimosa.

Use the leftover Sweet and Hot in an omelette or a frittata.

Friday
Jun072013

Teriyaki Pork Tenderloin with Spicy Thai Peanut Sauce

I was recently asked for some recipes for quick meals.  While I don’t believe you can really achieve any type of good flavor in 30 minutes or less, this recipe has a total work time of about 30 minutes.  With a day in between for marinating.  The peanut sauce can be used as a condiment for the meat, as a dressing for shredded cabbage to make a Thai Peanut Slaw, or over cooked linguini for Thai Peanut Noodles.  You may have to loosen the sauce just a bit with a little hot water and maybe a little more of the dark sesame oil for the Slaw or the Noodles.

Meat/Marinade:

1 cup orange or pineapple juice
1/4 cup vegetable oil
1/4 cup soy sauce
2 tbs minced garlic
2 tbs grated fresh ginger
2 whole pork tenderloins

One Day Before Serving:

Place the tenderloins in a large zip-lock bag (or a 9x13 baking dish).  Mix all of the ingredients together and pour into the bag.  Zip the bag tightly and leave in the refrigerator overnight.  Turn the bag in the morning to ensure even coverage. 

Serving Day: 

  • Preheat your grill to high.
  • When the grill is ready, remove the tenderloins from the bag and discard the marinade.  Pat them dry with paper towels, and brush with a little vegetable oil.
  • Place the tenderloins in the center of the grill, put the cover down and turn the burners down to medium high.   Grill for 7-8 minutes.
  • Brush the tenderloins with a little more oil, turn, cover, and grill another 7-8 minutes, until they have some resistance when pressed.  They should be cooked to medium, or approximately 160 degrees internal temperature.
  • Remove from the grill, and allow to rest, covered lightly with aluminum foil, while you make the sauce.

Spicy Peanut Sauce:

¾ cup natural unsalted peanut butter
¾ cup warm water
2 tbs minced garlic
2 tbs grated and chopped fresh ginger.
¼ cup soy sauce
2 tsp cayenne pepper
2 tsp honey
2 tsp dark sesame oil 

  • Place the peanut butter in a mixing bowl and add nearly all the water.  Mix together with a fork.  The peanut butter will eventually mix with the water, and become lighter in color.  Keep adding water a couple of tablespoons at a time, until you have something that looks like humus in color and texture.  The amount of water depends on the peanut butter, and how much solid to oil it has.  Just use your best judgment.
  • Add the garlic and the ginger and mix together.  Taste it.  You should taste both the garlic and ginger.  If you don’t, add more.
  • Now add the soy sauce and taste again.  If it doesn’t taste salty enough, add more, a tablespoon at a time, until it tastes right to you.
  • Add the cayenne pepper, mix and taste again.  Now you are looking for the right amount of heat.  Keep adding cayenne, ½ teaspoon at a time, until it is the right amount of heat for you.
  • Add the honey, mix and taste again.  The honey brings balance to the cayenne.  Keep adding and tasting until it tastes right to you.
  • Last, add the sesame oil, mix and taste.  The sesame oil will bring a roasted complexity to the sauce.  Add more until you like the taste.
  • Cut the pork tenderloins into ¼ inch slices and serve with the sauce.  
  • Alternatively, use the sauce as a dressing for freshly cut green cabbage for a spicy peanut slaw or cooked linguini for Thai Noodles, and serve with the pork.
Saturday
Jun012013

Bleu Bacon And Italian Burgers

The best burgers start with the best meat.  A grind of half sirloin and half chuck makes a really good burger.  You do need to make them by hand, or if you have a burger press, even better.  Just don’t press them too hard, or squeeze the meat too much.  Makes them tough.  

I use a grill plate on my gas grill, for lots of surface, and the result is a burger that will sear on the outside, and still be juicy on the inside.  Get your grill and the grill plate good and hot.


Basic Burger Ingredients (Yields 8 burgers)

4 lbs ground meat (8 ounces per burger)
4 Tbs vegetable oil (I use olive oil, but you don't have to)
1-1/2 tsp kosher salt
1 tsp ground black pepper
  • Form the burgers into 8 oz patties and place them on a tray.  If you want to make them in advance, cover them with plastic and leave in the refrigerator until you are ready to cook them.  In this case, cold is better than room temperature.
  • Mix the oil, salt and pepper in a small bowl.
  • Heat the grill and the grill plate as high as it will go.
  • When the grill is very hot, lightly brush the top of the burgers and place them oil side down on the grill plate.  Don’t move them.  Shut the grill cover, and set your timer for 4 minutes.
  • And for goodness sake, don’t stand there with your spatula in one hand and your beer in another and squash them, just to hear the sizzle.  You are not helping them cook faster; you are just drying them out.  If you can’t stand it, just take your timer and go get another beer.
  • When the timer goes off, lightly brush the tops of the burgers and flip them.  Close the cover again and set the timer for 3 minutes for medium rare, 4 minutes for medium.  Take them off to a platter, place the cheese toppings on them, cover them and let them rest until the cheese is melted, about 5 minutes.
  • Build the burgers with the remaining ingredients as instructed.

Bleu Cheese Burger Toppings:

4 oz wedge of soft Bleu Cheese
½ stick unsalted butter at room temperature
2 Tbs Worcester sauce
4 strips lean, hardwood smoked bacon, diced while its raw
2 large, sweet onions, peeled and diced
2 tsp extra virgin olive oil
1 Tbs Balsamic Vinegar
Salt and Pepper


For the Onions:

  • I cook the onions early in the day I am going to serve the burgers, and just leave them in the pan, covered, until I’m ready to use them.  Then just turn the heat back on for a few minutes to warm them up before topping the burgers with them.
  • In a medium non-stick skillet, render the bacon over medium high heat in the olive oil until it is just starting to crisp.
  • Add the onions to the pan, toss them to get them coated with fat, and turn the heat down to medium to medium low.  Turn them every 5 minutes or so, until they become very caramelized.  This process takes a little while, don’t rush it.  
  • Add the Balsamic and season with salt and pepper, and let cook another five minutes.  It should look like dark onion jam.  

For the Bleu Cheese Butter:

  • In a food processor, mix the Bleu Cheese, softened butter and the Worcester sauce.
  • Scrape the mixture out of the bowl onto a sheet of waxed paper, making a log about the size of a stick of butter.
  • Fold the wax paper over, and gently press the log into a round, fold up the ends, and chill in the refrigerator for at least two hours.  You can make this well in advance.
  • When your burgers come off the grill, place a couple of slices of the bleu cheese butter, and then a tablespoon or two of the caramelized onions on top, tent with a pan cover or some foil, and let them rest until the cheese is melted.  I like to serve these on a soft onion roll.

Italian Burger Toppings

2 large, vine ripe, beefsteak tomatoes
1 cup fresh basil leaves (or ½ cup Basil Olio Fra Diavlo)
1 cup good quality mayonnaise
2 cloves garlic, minced
4 ounces good quality fresh mozzarella cheese or Fontina cheese
2-4 ounces of baby arugula
  • If you already have checked on my food blog, and have made your Olio Fra Diavlo, just mix it with the mayonnaise in a bowl.  If not, then put the fresh basil leaves in a food processor along with the mayonnaise and the garlic and process until smooth.  Keep chilled until ready to use.
  • Cut the tomatoes and slice the cheese onto a plate, and lightly salt and pepper all of it.  (I salt and pepper the mozzarella, but not the Fontina.)
  • When your burgers come off the grill, place a couple of slices of cheese on top, tent with foil or a pan cover until the cheese is melted. 
  • Spread the top and bottom of the roll with the basil mayo, place the burger on the bottom half, layer a tomato slice on top of the cheese, a small handful of the arugula, and then the top half of the roll.  I like a simple soft bakery or egg twist roll for these burgers.
Sunday
Apr212013

Gramma Daly's Cole Slaw

We typically have ribs with my Gramma Daly's Cole Slaw

This is the simplest of recipes, with only five ingredients, and a minimum of fuss.  If your knife skills aren’t the best, you can use a grater, your food processor, or even purchase pre-shredded cabbage, but that would be my last resort.  You can toss the dressing with the cabbage in advance if you wish, as the amount of vinegar is not enough to make it wilt, but we prefer this tossed just before serving.  The result is a creamy, crunchy slaw unlike anything you will find in a restaurant (with the exception of Lenny and Joe’s Fishtale).  I also like to make this when the cabbage is tender, which I judge by how heavy the head feels in your hand when you hold it. 

Ingredients

1 large head green cabbage
1 cup mayonnaise (I use Hellman’s)
2-4 tsp sugar
2-4 tsp cider vinegar
2 tsp whole celery seed, slight ground with a mortar and pestle

  • Quarter the head of cabbage, and then slice each quarter, staring from the pointed top, and cut across, into 1/8th inch shreds.  Remove any of the core and place the shredded cabbage in a bowl large enough for tossing.
  • In a smaller bowl, add the mayonnaise, 2 tsp of sugar, and 2 tsp of vinegar and wisk.  Now taste it.  If it doesn’t taste “right” add an additional 1 tsp sugar, and 1 tsp vinegar and wisk again.  Taste it again. 
  • Repeat this until its right.  You will know, trust me.  I have taught this method to many of my friends, and they always get it right. 
  • Add the partially crushed celery seed and mix.  At this point, you can let the dressing sit in the refrigerator until you are ready to toss.
  • Add about half the dressing to the bowl and toss.  Keep adding the dressing by half until the cabbage is evenly and fairly heavily coated. 
  • Serve immediately, or let it keep, refrigerated, for a couple of hours.  We’ve kept the leftovers for another day, and it holds up fairly well, but not much after that.
Saturday
Apr202013

Little Sister's BBQ Ribs

I don't know where this recipe came from, I just remember my mother making these ribs in the oven and since we had never had the real thing, we thought they were pretty good.

I've taken this recipe up a notch, since Chris and I have become BBQ finatics. I still cook them in the oven for about 2 hours, and then move them to the smoker for the last 1 1/2 to 2 hours to give them that real smoke taste.  If you don't have a smoker, do them in the oven for about 3 1/2 hours, and then move them to your grill for the last 30 minutes to give them so real outdoor taste.  If you have a little smoker box for the grill, even better.  A word of caution:  if you use Chipotle chili powder, and the cayenne and the dry mustard you will get a very, very spicy result.  If you don't like your food spicy, use a sweet chili powder and eliminate the cayenne and dry mustard.

2 racks unseasoned baby back ribs

For the Rub:

¼ cup brown sugar
2 Tbs paprika (sweet smoked if you have it)
1 Tbs black pepper
1 Tbs salt
1 Tbs chili powder (chipotle if you have it)
1 tsp cayenne
1 tsp celery seed, ground
1 tsp cumin
1 tsp dry mustarg
1 tsp coriander
½ tsp ground clove or allspice
2 cups cider vinegar (and 2 cups more for the smoker)
2 cups water (and 2 quarts more for the smoker)

  • Soak your wood chips or chunks in water for about an hour before starting your smoker.  I usually soak them right as I put the ribs in the oven.
  • Mix all of the dry ingredients together.  You should get about 1 cup of rub, which is twice what you will need for this recipe.  You can save the rest in a sealed plastic container for any type of grilling.
  • Pour 2 cups vinegar and 2 cups water in the bottom of a large non-reactive roasting pan.
  • Sprinkle the rub on the ribs on both sides, and rub it in a little, then place the ribs on a rack in the roasting pan, and cover tightly with foil.
  • Roast in 225 degree oven for about 2 hours if you are going to move them to the smoker.   If not, let them go for 3 ½ hours. 
  • Remove the ribs from the oven, and reserve the liquid.  
  • Finish cooking your ribs on a medium hot grill for about 15 minutes on both sides, or
  • Place your wood chips in the lower pan of your smoker, following your smoker’s directions for placement.  Then add the 2 quarts water and 2 cups cider vinegar to the water pan, following your smoker’s directions.
  • Place the ribs on the racks in the smoker, cover and cook them another 2 hours at anywhere between 225 and 300.  Smokers are really notorious for not having accurate gauges.  When the ribs fall apart, they are done.  Just let them go at least two hours before you test them as you will increase the cooking time if you keep taking the cover off.
  • Add more wood chips through the little door in the smoker compartment when you don’t see any more smoke coming out of the smoker.
  • While the ribs are cooking, pour the reserved liquid into a small sauce pan and reduce.  If you want to make your BBQ sauce a little sweeter and thicker, add about one cup ketchup and simmer until thick.
  • We don’t baste our ribs in the sauce until they actually come off the heat.  Your choice, but the sugar in the baste will burn if your grill is too hot.  If you like that, go for it.
Sunday
Apr072013

Slow Cooked Thai Pork and Coconut Rice and Peas

I had originally tried this method of cooking pork tenderloins for carnitas, and decided I would switch up the seasonings and give this a try.   Really easy.  We served it over tender shredded green cabbage with no other dressing, and Grace The Girl ate the rice and peas.

For the Pork

2 whole pork tenderloins
2 stalks lemongrass, trimmed
2 Tbs red Thai chili paste (you can find this in a specialty store, or check the grocery aisle near the Asian foods
2 cans lite coconut milk
1 can regular coconut milk
1 small onion, quartered
2 cloves garlic, peeled
2 tsp salt
1 tsp white pepper

  • Rub the pork with the salt and pepper.
  • Put the pork, lemongrass, one can of the lite coconut milk, onion and garlic into the slow cooker.  Cover and cook on slow for about 4 hours.
  • Remove the pork to a board and allow it to rest while you finish the sauce.
  • Strain the liquid into a large sauce pan, and discard the remaining solids.
  • Add the chili paste and the other can of coconut milk to the liquid and simmer for about 30 minutes, until it starts to thicken.
  • While the sauce is reducing, shred the pork.  When the sauce has reduced down so that it will coat the pork, toss the pork into the saucepan and turn to coat evenly. 

For the Rice: 

1 cup lite coconut milk
1 cup jasmine or basmati rice
½ cup frozen peas
1 tsp salt 

  • Thaw the peas in a strainer under cold running water.
  • Pour the can of coconut milk into a 2 cup measure, and add water enough to make 2 cups.  Pour this into a medium sauce pan.
  • Add the rice and the salt to the pan, bring to a boil, then cover and simmer on very low until the liquid is totally absorbed, about 15 minutes.  Use a timer, and set it to 13 minutes.
  • When the timer goes off, heat the peas in the microwave for 2 minutes
  • Add the peas to the pan and return the cover.  When ready to serve, fluff the peas into the rice. 
Sunday
Apr072013

Homemade Italian Sausage

I love to buy the whole pork loin (not the tenderloin) in the cryovac packaging, when it goes on sale.  Let’s face it, you can’t do much better than $1.99 a pound.  And with very little waste.

You can either cut the meat yourself, or ask the Meat Department to cut it for you.  I cut about 4-6 inches off either end of the roast, maintaining the center cut as a whole roast.  This will yield you about 5 lbs.  What do you do with the rest of the meat?

I finally found the perfect solution:  make sausage.

Ingredients:

3 lbs ground pork (optionally, substitute ground pork from the grocery or your butcher)
2 tsp kosher salt
2 tsp fresh, finely ground black pepper (I use my spice grinder)
1 tps red pepper flakes, slightly crushed or roughly ground.
1 tsp dried whole fennel seeds, slightly crushed or roughly ground
2 Tbs fresh Sage, finely chopped
4 cloves garlic, finely minced

For the Ground Pork:

I’ve always thought this a complicated process, but really, it doesn’t have to be.  I used the meat grinder attachment to my stand mixer, and it worked beautifully. 

And, I eliminated stuffing of the casing, well, since I didn’t have any casings, but also because this requires yet another attachment.  Which I didn’t have, either.  

I made sausage patties instead.

I cut the meat into 1 inch chunks, and also trimmed off any of the sinew or thicker areas of fat.  It just gets stuck in the grinder, which you then have to take apart.

No thanks.

I used the fine grind plate as one of my pet peeves with the Italian Style Sausage you find around the Northeast is that it tends to be coarsely ground.  Not my favorite thing.

Finally, I crush or slightly grind whole spices in seed form, whenever I can.  It releases the oil and intensifies the flavor.  I also mix all of the spices, herbs, salt and pepper in a separate bowl, and thoroughly mix them.  This will spread the flavors more evenly in whatever you add them to.

Instructions:

Use the blade with the smaller holes for the meat grinder attachment.  Place a large bowl (not the bowl for the mixer), underneath the attachment.

Turn the mixture on, and drop the meat, piece by piece, into the grinder.  Use the wooden pusher to keep pushing the meat down.

The grinder will drop all of the meat into the bowl.  When you have finished grinding the meat, place the bowl for the stand mixer under the grinder, then spoon all of the ground meat back through the grinder again.

When you have finished, remove the grinder attachment for cleaning.

Place the mixer bowl underneath the stand mixer, and using the paddle attachment, mix the spices into the meat with a few turns of the paddle.

If you have a #24 ice cream scoop, use that to make the sausage balls, otherwise, roll the meat into 2 inch balls.

You can either bake them in the oven at 375 for about 35 minutes, or gently fry them in a pan with a little olive oil if you are going to make them into part of a sauce. 

I have two suggestions for serving these:

Sausage with Fennel, Sweet and Hot Cherry Peppers and White Wine (next post), or

Sausage with Homemade Marinara Sauce (if you really need to know how to make this, I'll do a post.  Let me know.)

Either would be good as is, over pasta, or served on an Italian roll.  Don’t forget the cheese.

Sunday
Apr072013

California Grilled Artichokes


We had artichokes in Italy, but they did not bear any resemblance to the stuffed and steamed versions I grew up with in the Northeast.  In fact, they were quite inedible:

Baby artichokes, sliced in half and just steamed.  Dangerous chokes included.  Not my cup of tea. 

While I love the stuffed artichoke recipe my mother made us as kids, I find this recipe faster, a little lighter on the waistline, and yet distinctively California Italian.

Ingredients:

2 extra large (Lion Head if possible), fresh artichokes
Olive Oil
Salt & Pepper
½ lemon
Whole peeled garlic clove

Dipping Sauce:

1 cup mayonnaise
2 tablespoons fresh lemon juice
2 cloves garlic, minced
2 Tbs Worcester sauce
Black Pepper

  • Up to one day in advance: 
  • Fill a large stock pot or Dutch oven, with the whole artichokes, enough water to half submerge them, 2 tablespoons olive oil, the whole garlic clove, and the ½ lemon.
  • Over medium heat, let the artichokes simmer in the water for about 15-20 minutes, then turn them to submerge the other side, for another 15-20 minutes.  They are done when you can easily pull off one of the outer leaves. 
  • Alternatively, you can use a steamer to accomplish the same thing. 
  • Remove the artichokes from the steam/water bath, allow them to cool, and then either refrigerate or prepare for grilling. 
  • In the meantime, make the sauce, by whisking all of the dipping sauce ingredients together and refrigerate until ready to use.
  • Prepare the artichokes for grilling by slicing them in half lengthwise, using a serrated knife.  Using a paring knife, cut the choke away from the heart, running the tip through the base of the choke fibers, just where they meet the heart.  Pull the choke fibers out and discard.  I sometimes use a teaspoon to get all of the choke out.
  • Place the artichokes in a pan and brush them with olive oil, then sprinkle with salt and pepper. 
  • Heat your grill to medium high to high.  It’s best to use a grill plate, as it will give more surface and more char to the food placed on it.  Place the artichokes flat side down on the grill plate, and grill until the surface is slightly charred, and the artichokes are heated through.
  • Place two halves of the artichokes in an individual bowl, along with a small, individual bowl of the dipping sauce for serving. 
  • Don’t forget an empty bowl for the discarded leaves.


Wednesday
Mar062013

Corned Beef with Homemade Sauerkraut and Remoulade Sauce

Best made and served immediately.  Leftovers resemble the commercially produced sauerkraut I invented this dish to avoid.

Ingredients

2 slices bacon, diced
2 cloves garlic, minced
1 tsp whole caraway seeds
1 Tbs olive oil
1 medium sweet onion, diced
1 head green cabbage, cored and thinly sliced
Salt and Pepper to taste
2 Tbs Apple Cider Vinegar

  • In a large sauté pan, render the bacon until it begins to crisp
  • Add the garlic and the caraway seeds and sauté until the caraway becomes fragrant and the garlic begins to turn golden.
  • Add the onion and sauté until the onion starts to turn golden.
  • Add the olive oil, allow it to get hot, then add the cabbage.
  • Turn the cabbage to coat it in the fat and oil, then allow it to start to color on the edges, before turning again.
  • Every few minutes (2-3), turn the cabbage until most of the edges have some color on them, adding a pinch of salt and pepper at every turn.
  • Add the vinegar, toss, and cover the pan.  
  • Cook in the pan for about 5 minutes, until the steam from the cidar and cabbage has dissolved all the brown bits on the bottom of the pan. 
  • Serve immediately.

Remoulade Sauce

A much more interesting sauce then the American “Russian” dressing, or “special sauce” if that is how you grew up with this stuff.   Also good as a cocktail sauce for cold shrimp.

Ingredients

  • 1 cup mayonnaise (use what you grew up with)
  • 3 fresh, whole garlic dill pickles (in the refrigerator section at your grocers), chopped and drained
  • 2 Tbs Dijon mustard
  • 1 tsp capers, chopped and drained
  • 2 Tbs chili sauce or ketchup
  • 1 inch squeeze of anchovy paste
  • 1 tsp hot sauce, more or less to taste

Mix all of the ingredients in a bowl and chill for a couple of hours.

Wednesday
Mar062013

Chicken Vegetable Soup with Broccoli Rabe

Any soup is best made with homemade stock.  Caution:  Broccoli Rabe likes to be cooked, but doesn’t like to hang around.  If I want leftovers, I spoon some out just when I have added all of the ingredients. Just don’t reheat and reheat thinking that this is one of those:  "it gets better the next day" dishes.
 

Ingredients:

2 Tbs Olive OIl 
2 strips bacon, or 2 links Italian Sausage
4 cloves garlic, minced
1 tsp hot red pepper flakes
2 large, sweet onions, diced
4 celery stalks, diced
2 large carrots, diced
1 medium bunch broccoli rabe, washed and chopped (discard the lower stems)
2 Tbs fresh oregano, leaves only, chopped
Salt to taste
2 quarts chicken stock
1 can small white beans, rinsed
2 cups shredded cooked chicken meat
  • In a large Dutch oven, heat one TBS of the olive oil, and then either render the bacon, or brown the Italian sausage, then remove from the pan and set aside.
  • Add the garlic, oregano, and the red pepper flakes and quickly stir.  Don’t let the garlic get past golden, or it will burn by the time you get the onions in.
  • Add the onions and immediately stir to coat them with the fat and get the garlic and pepper off the bottom of the pan.  You can add the remaining olive oil at this stage is there is not enough fat to brown the vegetables.
  • Once the onions start to turn golden, add the celery, and sauté it in with the onions for another 2-3 minutes.
  • Add the carrots, and sauté another 2-3 minutes
  • Add the salt, and stir.  Remember, you are just salting the vegetables, not the entire pot.  That seasoning should be at the very end when you can tell how much salt was in your chicken or your stock.
  • Add the chopped broccoli rabe, stir and sauté until it complete wilts into the vegetables.
  • Add the stock, and bring to a simmer until the carrots are tender, about 15 minutes.
  • In the meatime, if you used Italian sausage, slice it (even if it was not cooked all the way through), and add it to the pan.
  • Add the chicken and the beans, and allow them to heat all the way through.
  • If you used bacon, sprinkle the crumbed bacon on top, then serve with grated parmesan cheese and chiabatta bread.
Sunday
Mar032013

Fetticini Alfredo with Bacon and Peas

We used to call this hay and straw, using both plain and spinach fettuccini.   The Girl doesn’t like spinach pasta, so we use fresh peas for the green. 

I used to try to make this recipe in a low-fat version.  Doesn’t work.  There has to be enough fat in the sauce to keep it from breaking, and once you get past a certain point, that’s exactly what it does.  So go for it, and just have it once or twice a year.  It’s worth it. 

It’s simple enough to make (in fact, Grace made the sauce) so why anyone would feed their kids out of a blue box makes no sense to me.  You can make the sauce a day or so in advance, and just heat it through while the water is boiling.  We used fresh fettuccine pasta here, but decided it would be better with a shape that the peas got caught in.

Ingredients

1-1/2 lbs fresh fettuccine
2 cups heavy cream
4-5 cups fresh grated Reggiana Parmesana cheese (about 8 oz)
1 stick unsalted butter
1-2 cups freshly shelled peas
1 cup finely sliced and slivered ham, or cooked, crumbled bacon
White pepper and fresh grated nutmeg
NO SALT (taste and adjust the salt at the end)

  • In a medium heavy saucepan, melt the butter. 
  • When it is melted, add the heavy cream.  Allow the butter and cream to simmer for 2-3 minutes, being careful not to have the heat up high enough to scald it.
  • Add the cheese, about half first, then keep adding and allowing the cheese to thoroughly melt.  Once the sauce is smooth and silky, and coats the back of a spoon, it’s done.  Taste it for seasoning, add the white pepper and just a pinch of nutmeg.
  • Bring 6-8 quarts of water to a boil, adding 1-2 teaspoons of salt to the water just as it is coming up.
  •  Add the pasta and cook until it is al dente.  Fresh pasta only takes 2-4 minutes to cook, dried takes up to 10 minutes, depending on how big your pot is.  The bigger the pot, the more water you have in it, the faster the pasta cooks.  For the last 2 minutes, add the peas into the boiling pasta.
  •  Drain the pasta, but don’t rinse it.  (NEVER RINSE PASTA.)  Put the pan back on the stove and turn the heat back on to medium.  Make sure all of the water is dried out of the pan before you add anything back.  While the pasta is draining, put the sauce into the pasta pan.  When it is heated through (if you made it in advance), add the ham or bacon, and the drained pasta, and toss.  Serve with remaining grated cheese.  Your kids (and friends) will lick their bowls.